PayPal for freelancers: Everything you need to know

Following client guidelines and delivering work is only one part of being a freelancer. There’s so much more to making a living from freelance work.
For starters, you’ll also need to find freelance clients, send invoices, reach out to clients, follow up on payments, overlook your finances, service your clients, and a lot more. And these tasks can be extremely tedious, especially if you don’t have the right systems to back you up.
One aspect of freelancing that requires attention and a proper system in place is the receipt of payments – a simple process that helps you maintain your accounts and accept and track payments while allowing ease of payment for the client.
As a freelancer, there are several ways you can get paid for the work you do, from bank transfers to physical cheques, and each has its own set of pros and cons.
However, PayPal is one of the easiest payment methods used by a whopping one million freelancers worldwide. Not only freelancers but also clients trust this online payment system—given its popularity and ease.
With PayPal, freelance clients can pay you with the click of a button. It’s quick, hassle-free, and convenient for both parties. Moreover, it’s used internationally and is a reliable option if you want to take your freelancing career global.
Receiving payments from clients with a reliable tool is a need more than a choice for your freelance business. So, if you want to make PayPal your go-to source of receiving payments, here’s how you can get started
How to set up a PayPal account
Fun fact: Setting up a PayPal account is simple and free, making it one of the most important digital tools for freelancers.
Here’s a breakdown of how you can create one for your freelance business:
- Head to PayPal.com or download the app and click on sign up.
- Create a ‘Personal Account’ — you don’t need a ‘Business Account’ to start with, but you can easily upgrade to one if you scale up your business in the future.

- Enter your name, email address, and debit/credit card or bank details.

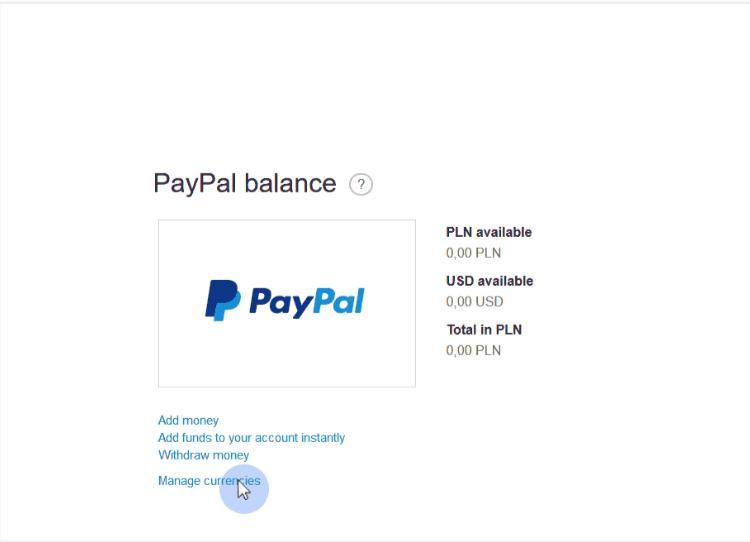
- Log in to your new PayPal account. Click on Wallet → PayPal Balance.
Now, open the ‘Manage Currencies’ link and add all the international currencies you’ll receive payments in. Be careful with this—PayPal charges a fee for payments from a currency not selected in your account.
With these four simple steps, you will have successfully created a PayPal account. It might take a few days for PayPal to verify and authenticate your account and bank details. After this, you’ll be ready to receive payments.
How to get paid for your freelance work via PayPal
It’s time to get to the exciting part of it all – receiving payment for the work you’ve done.
You’ll be surprised to know how simple it is to receive money through PayPal. All your clients need to send you the payment is the email address with which you registered on the platform.
The sender will enter the email id and amount, confirm the transaction—and your PayPal account will get credited the same day.
To make things even simpler, you can create a personalized PayPal.me link for yourself, as shown here. You can share this link via email and ask your clients to pay with one click of a button.
If the client pays in another currency than that of your country, PayPal automatically applies the exchange rate—so you’ll receive the payment in your local currency only.
While PayPal does not charge a monthly fee, but there is a currency conversion fee involved – the rates of which differ with country and time.

You can handle the conversion fee yourself or politely ask your clients to do it—you can even include it as a term in your contract.
PayPal’s Seller Protection policy also applies to intangible products like digital products and services, thus safeguarding you from any fraud or mishap.
How to withdraw money from PayPal
You can keep the money in your PayPal account and directly use it for your freelance expenses, or you can transfer the money to your linked bank account.
For the latter, here’s how you go about it:
- Open the Summary page of your PayPal account and click on ‘Transfer Money.’
- Select ‘Transfer to your bank.’ Now, you can either transfer instantly to a linked debit card with a small fee or your bank account for free. The latter can take 1-3 business days.
- Once you choose your transfer method, click ‘Next.’ Enter the amount, confirm the payment, and you’re done!
You can even receive a cheque for the money, but again, this involves a fee.
With these steps, you can transfer your PayPal account money and use it however you like.
Set up your PayPal account and start getting paid!
Given how fast, easy, and reliable it is, no wonder PayPal is a preferred mode of payment for freelancers globally. You get to receive payments from clients – even international ones, without any hassles or pain. And the best part is that all your bank information is safe and secure.
Now that you’ve understood how PayPal works, it’s time for you to create an account for yourself and include the platform in your freelance toolkit for easy money transfers.
Adela Belin is a content marketer and blogger at Writers Per Hour. She is passionate about sharing stories with the hope to make a difference in people’s lives and contribute to their personal and professional growth. Find her on Twitter and LinkedIn.