A practical guide to test your garage door safety features

Dual Safety Systems: Expert Auto Reverse Feature Explained
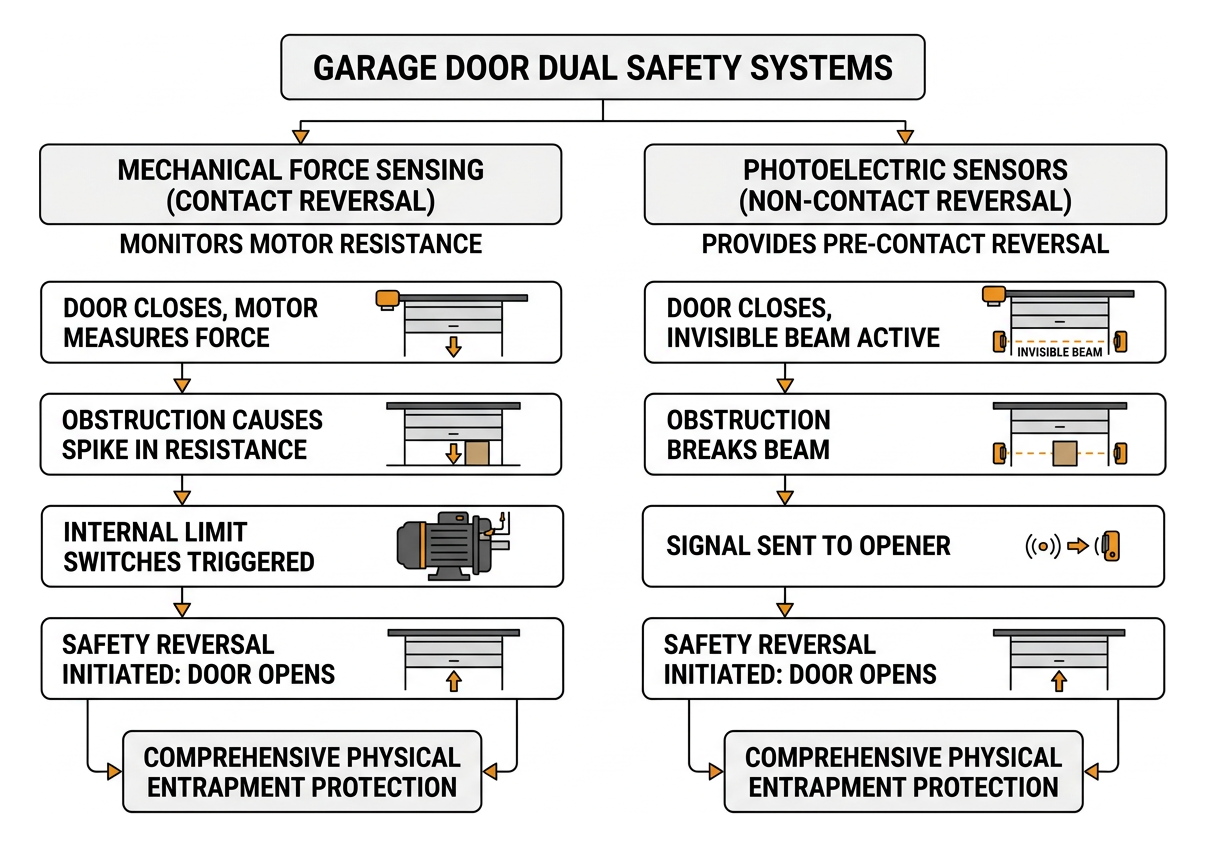
At the heart of modern garage door safety are two distinct yet complementary systems that work in tandem to prevent entrapment and injury: mechanical force detection and photoelectric sensors. Both are crucial components of the auto reverse feature, providing comprehensive physical entrapment protection. When we talk about how the auto reverse feature on garage doors explained, we’re really discussing these two mechanisms and how they ensure your door operates safely.
The primary goal of these systems is to detect obstructions during the door’s closing cycle. The mechanical force sensing mechanism is designed to react to unexpected resistance, while the photoelectric sensors provide a non-contact reversal, stopping the door before it even makes physical contact with an obstruction. These safety standards, mandated by federal law, are what make your garage door a safe and reliable component of your home.
Mechanical Force Sensing Mechanisms: Expert Auto Reverse Feature Explained
The mechanical force sensing mechanism, often referred to as contact reversal, is an ingenious system built directly into your garage door opener’s motor. Its function is to monitor the closing force exerted by the door. As the door descends, the opener’s motor resistance is continuously measured. If the door encounters an obstruction—be it a person, pet, or object—it creates an unexpected increase in this resistance.
This spike in resistance triggers internal limit switches within the opener. When the threshold resistance is exceeded, the system immediately interprets this as an obstruction. The opener then initiates a safety reversal cycle: the door stops its downward motion and reverses, moving back to its fully open position. This ensures that any obstruction is freed without harm. It’s a critical backup system, especially if the primary non-contact sensors are compromised.
Photoelectric Sensor Technology: Expert Auto Reverse Feature Explained
Photoelectric sensors, often called “photo eyes” or “safety eyes,” provide the first line of defense against entrapment. These are the small units typically mounted on each side of your garage door opening, about 4 to 6 inches above the floor. They work by emitting and receiving an invisible infrared beam across the door’s path.
One unit acts as a sender, projecting the infrared beam, while the other acts as a receiver, continuously detecting that beam. For the door to close, this beam must remain unbroken. If anything crosses the path of the infrared beam during the door’s closing cycle, the beam interruption is instantly detected. This triggers the opener to stop the door’s descent and immediately reverse it to the fully open position, preventing physical contact with the obstruction. Proper optical alignment between the sender and receiver units is vital for these sensors to function correctly.
Feature Photoelectric Sensors Mechanical Force Sensing Detection MethodInfrared beam interruption Motor resistance/downward pressure limits Activation Point Before physical contact (non-contact reversal) Upon physical contact with an obstruction Primary Role Prevent contact with obstructions Secondary safety; reverse after contact Mounting 4-6 inches above floor, on either side of door Integrated within the garage door opener motor Common Issues Misalignment, dirt/debris, sunlight interference Incorrect force settings, unbalanced door, worn components Federal Requirement Required for all openers manufactured post-1993 Required for all openers manufactured post-1993 Step-by-Step Methods to Test Your Garage Door Safety Features
Regular testing of your garage door’s auto reverse feature is not just a recommendation; it’s a critical monthly task for every homeowner. These monthly testing routines ensure that both the mechanical force sensing and photoelectric sensor systems are fully operational, providing the safety they were designed for. Before you begin any testing, always prioritize safety precautions. Ensure the area around the garage door is clear, and never attempt to test with body parts. It’s also a good practice to periodically check your door’s balance and ensure the manual release cord is easily accessible and functional in case of an emergency. For comprehensive guidance on maintaining your garage door’s safety features, including an Expert auto reverse feature explained in detail, refer to specialized resources.
The 2×4 Mechanical Resistance Test
This test specifically checks the mechanical force sensing mechanism, ensuring the door reverses upon contact with an obstruction.
- Preparation: Locate a flat 2×4 board. A standard 2×4 is typically 1.5 inches thick, which is the industry standard for testing this feature.
- Placement: Lay the 2×4 board flat on the garage floor, directly in the path of the garage door. Position it centrally so the door will make full contact.
- Initiate Closing: Activate your garage door opener to close the door.
- Observe Reversal: Watch the door as it descends. When the bottom edge of the door makes contact with the 2×4, it should immediately stop its downward motion and then reverse, moving back to the fully open position. The entire contact reversal response, from impact to full reversal, should ideally occur within about two seconds.
- Assessment: If the door hesitates, struggles, or fails to reverse, pushing down on the 2×4 with significant downward force resistance, your mechanical force sensing mechanism is not working correctly. This indicates an issue with the impact threshold or force settings.
The Photo-Eye Non-Contact Beam Test
This test verifies the functionality of your photoelectric sensors, ensuring they detect obstructions before contact.
- Preparation: Locate a sturdy object, like a cardboard box or a small trash can. Avoid using your foot or hand for this test.
- Initiate Closing: Start the garage door closing cycle.
- Obstruct the Beam: While the door is descending, place your chosen object in the path of the infrared beam, between the two photo-eye sensors. Do this before the door reaches the object, simulating an active closing cycle obstruction.
- Observe Reversal: The moment the object breaks the infrared beam, the door should immediately stop its downward movement and trigger an automatic reopening. It should not make contact with the object.
- Check Indicators: Many photo-eye sensors have visual indicator LEDs (often green for alignment, amber for obstruction). If the door reverses, check that the indicator light on the receiver sensor (the one that detects the beam) changes or blinks, confirming it registered the beam interruption.
- Assessment: If the door continues to close, hits the object, or fails to reverse, your photo-eye sensors are not functioning correctly. This could be due to misalignment, dirt, or a wiring issue.
Diagnosing and Calibrating Common Auto-Reverse Faults
Even with regular testing, your garage door’s auto-reverse feature might occasionally malfunction. Understanding common issues and how to address them can save you time and ensure continued safety. Many issues stem from sensitivity screw calibration, travel limit adjustments, or environmental factors. Other problems can arise from basic maintenance needs like lens cleaning, or external influences such as sensor sun glare, track friction, roller binding, or incorrect spring tension.
Sensor Realignment and Obstruction Clearing
One of the most frequent causes of photo-eye sensor failure is misalignment or obstruction.
- Check for Obstructions: Begin by visually inspecting both sensor lenses. Dust, dirt, spiderwebs, or even small debris can block the infrared beam. Gently wipe the lenses with a soft, dry cloth.
- Verify Alignment: The sensors must be perfectly aligned with each other. If one sensor’s bracket is bent or loose, it can cause misalignment. Loosen the wing nut or screw on the bracket, gently adjust the sensor until the visual indicator LEDs on both units show a solid light (usually green or amber, consult your manual). This indicates proper alignment. Tighten the bracket securely.
- Sunlight Interference: Direct sunlight can sometimes interfere with the infrared beam, especially in garages with large windows or when the sun is low in the sky. If you suspect sensor sun glare, consider installing a simple sun shield (often available from manufacturers or easily fabricated) around the affected sensor to block direct light.
- Wiring Integrity: Check the wiring connected to both sensors. Ensure there are no loose connections, frayed wires, or signs of damage. A faulty wire can prevent the beam from being transmitted or received.
Adjusting Close Force and Travel Limit Settings
If your garage door passes the photo-eye test but fails the 2×4 mechanical resistance test, the issue likely lies with the close force or travel limit settings. These adjustments are typically made using force adjustment dials or screws on the garage door opener motor head.
- Locate Adjustments: Consult your garage door opener’s owner’s manual to identify the “Close Force” and “Down Travel Limit” adjustment points. They are usually labeled with arrows or symbols (+/-).
- Adjust Close Force: The close force setting determines how much resistance the door can encounter before reversing. If the door isn’t reversing on the 2×4, the force might be set too high. Make very small, incremental calibration adjustments, turning the dial slightly towards the “less force” or “-” setting (usually a quarter turn at a time).
- Retest: After each adjustment, retest the door using the 2×4 method. Continue making small adjustments and retesting until the door reverses reliably upon contact with the 2×4. The goal is to set the minimum force required to close the door fully without it reversing prematurely.
- Adjust Down Travel Limit: The down travel limit dictates how far the door closes before the opener stops. If the door is reversing immediately after touching the floor, the travel limit might be set too low, causing it to “think” it’s hitting an obstruction. Adjust this setting incrementally to allow the door to fully close and create a proper floor seal without over-travel correction. Conversely, if the door isn’t closing completely, the limit might be set too high.
- Mechanical Resistance Balance: An unbalanced garage door (due to worn springs or tracks) can also affect how the force settings behave. Always ensure your door is properly balanced by manually opening it halfway; it should stay in place without assistance. If it drifts, address the underlying balance issue before fine-tuning force settings.
Maintenance Schedules and When to Call a Professional
Maintaining your garage door’s auto reverse system is an ongoing commitment to safety. We recommend performing the 2×4 and photo-eye tests at least every 30 days. This regular check-up ensures that any minor issues are caught before they become significant safety hazards. Beyond these routine tests, consider the lifespan of your garage door’s components. Most springs, for instance, last about 7 to 10 years or roughly 10,000 cycles. Worn springs can affect the door’s balance and impact the effectiveness of the auto-reverse system.
High-tension cable dangers are also a serious concern. Garage door springs and cables are under immense tension and can cause severe injury if handled improperly. Never attempt to repair or replace these components yourself unless you are a trained professional.
If your garage door opener was manufactured before January 1, 1993, it likely does not have the federally mandated auto-reverse features, including photo-eye sensors. In this case, a pre-1993 opener replacement is strongly recommended to meet modern safety standards.
We advise calling for a professional safety inspection annually. A certified technician can perform a thorough check of all components, including springs, cables, rollers, tracks, and the opener’s internal mechanisms. They can identify subtle issues that might not be apparent during a DIY test and ensure all settings are calibrated perfectly for optimal safety and performance. If you encounter any of the following, it’s time to call a professional:
- The door fails either the 2×4 or photo-eye test after you’ve attempted basic adjustments.
- You notice unusual noises, jerky movements, or the door struggling to open or close.
- There are visible signs of damage to springs, cables, or tracks.
- You have an older opener that lacks modern safety features.
- You’re uncomfortable performing adjustments or repairs yourself.
Frequently Asked Questions About Garage Door Safety Reversal
Why does my garage door reverse immediately after touching the floor?
If your garage door reverses immediately after touching the floor, it’s a common issue often related to the travel limit settings or down force sensitivity. The “down travel limit” tells the opener how far the door should close. If this limit is set too low, the opener thinks the door has reached its closing point prematurely, causing it to reverse. Alternatively, the “close limit calibration” might be off, or the “down force sensitivity” could be set too high, causing the door to interpret the slight resistance of making contact with the floor or the floor seal pressure as an obstruction. To address this, you would typically adjust the down travel limit slightly upward and/or reduce the close force sensitivity incrementally, always retesting after each small adjustment.
Is it legal or safe to disable the garage door auto reverse feature?
No, it is neither legal nor safe to disable the garage door auto reverse feature. Since January 1, 1993, U.S. federal law, under the UL 325 regulations, has mandated that all residential garage door openers include both a contact-reversal system and photoelectric safety sensors. Disabling these features creates an extreme entrapment hazard, significantly increasing the risk of serious injury or death to people or pets. Beyond the moral and safety implications, doing so can also lead to significant property liability for the homeowner in the event of an accident. It’s a violation of federal safety compliance and should never be considered.
What should I do if my garage door fails the 2×4 safety test?
If your garage door fails the 2×4 safety test, meaning it doesn’t reverse upon contact with the 2×4, you should immediately take action. First, ensure the door’s tracks are clear and lubricated, and that rollers aren’t binding, as these can affect the door’s balance and the force required to move it. Next, attempt minor force setting adjustments on your opener, incrementally reducing the “close force” (or increasing sensitivity, depending on your model) and retesting after each small change. If these steps don’t resolve the issue, or if you’re uncomfortable making adjustments, it’s crucial to stop using the automatic opener. Switch to manual operation safety by pulling the emergency release cord and operating the door by hand until a professional can inspect and repair the system. A professional service call is highly recommended to diagnose and fix the underlying problem, ensuring your door’s safety mechanisms are fully functional.
Conclusion
Understanding how the auto reverse feature on garage doors explained works is more than just technical knowledge; it’s a fundamental aspect of home safety. By diligently performing routine safety testing, homeowners play a crucial role in preventing potential entrapment hazards. The dual systems of photoelectric sensors and mechanical force detection are engineered to protect, but their effectiveness relies on proper maintenance and regular checks. Embrace these homeowner maintenance best practices, from cleaning sensors to testing reversal mechanisms monthly. Proactive safety inspection and addressing issues promptly are the best ways to ensure your garage door remains a secure and reliable entry point for your home. Prioritizing these steps safeguards not only your property but, more importantly, the well-being of everyone who passes through your garage.